Bookmark with:


Codalogic LMX Quick Intro

The Codalogic LMX code generator allows you to easily read and write XML data in C++ programs. The code generated by LMX de-serializes XML into application specific C++ objects, and serializes the C++ objects into XML.
As shown in the diagram, LMX uses a specification of your XML data to generate application specific C++ code. The specification can be an example of your XML data, an Annotated XML Example (AXE), or an XML XSD Schema. Using the generated code, your code can easily access the XML data.
For example, an XML example of:
<TeamName>Luke</TeamName>
or an
Annotated XML Example of:
<TeamName>string</TeamName>
or an XSD snippet such as:
<xs:element name="TeamName" type="xs:string"/>
generates class methods of the form:
    const lmx::tlmx_unicode_string & get_TeamName() const;
    lmx::elmx_error set_TeamName( const lmx::tlmx_unicode_string & s );
where
lmx::tlmx_unicode_string is
typedefd to
std::string and you can use it in your code as:
std::cout << my_object.get_TeamName() << "\n";
This quick guide explains how to use LMX.
You can download a ZIP file containing files for this example.
The XML Data Specification
The format of your XML data can be specified in a number of ways.
The simplest is an example of your XML data. For this introduction this might be:
<ProjectTeam xmlns="http://codalogic.com/schemas/team.xsd">
    <TeamName>Skywalkers</TeamName>
    <Member>
        <Name>Anakin</Name>
        <BrainPower>115</BrainPower>
    </Member>
    <Member>
        <Name>Luke</Name>
        <BrainPower>108</BrainPower>
    </Member>
</ProjectTeam>
Often a single example of your XML data isn't sufficient to capture all the variations that your XML supports. In this case you can add additional characters to annotate your example. Such an
Annoated XML Example might look like:
<ProjectTeam xmlns="http://codalogic.com/schemas/team.xsd">
    <TeamName>string</TeamName>
    * <Member>
        <Name>string</Name>
        <BrainPower>unsignedInt</BrainPower>
    </Member>
</ProjectTeam>
If you have complex needs, you can also use an XML Schema (XSD) to describe your XML, for example:
<xs:schema xmlns:xs="http://www.w3.org/2001/XMLSchema"
        xmlns="http://codalogic.com/schemas/team.xsd"
        targetNamespace="http://codalogic.com/schemas/team.xsd"
        elementFormDefault="qualified">

    <xs:element name="ProjectTeam">
        <xs:complexType>
            <xs:sequence>
                <xs:element name="TeamName" type="xs:string"/>
                <xs:element name="Member" type="TeamMember"
                            minOccurs="0" maxOccurs="unbounded"/>
            </xs:sequence>
        </xs:complexType>
    </xs:element>

    <xs:complexType name="TeamMember">
        <xs:sequence>
            <xs:element name="Name" type="xs:string"/>
            <xs:element name="BrainPower" type="xs:unsignedInt"/>
        </xs:sequence>
    </xs:complexType>

</xs:schema>
Each of these specifications define an outer element called
ProjectTeam, which contains an Element called
TeamName and multiple
Member elements. Each
Member element has a
Name for the member and a
BrainPower value.
An example XML instance of these specifications is as follows:
<ProjectTeam xmlns="http://codalogic.com/schemas/team.xsd">
    <TeamName>Skywalkers</TeamName>
    <Member>
        <Name>Anakin</Name>
        <BrainPower>115</BrainPower>
    </Member>
    <Member>
        <Name>Luke</Name>
        <BrainPower>108</BrainPower>
    </Member>
    <Member>
        <Name>Leia</Name>
        <BrainPower>128</BrainPower>
    </Member>
</ProjectTeam>
As you can see, this project team is called Skywalkers, and has three members; Anakin, Luke and Leia. Their combined brain power is 351.
Generating C++ code from the XML specification
Codalogic LMX generates C++ code from the XML specification. There are a number of different versions of LMX, with both GUI and command-line interfaces running on Windows and Linux. In this intro we will use the Window GUI interface: WinLMX.
The simplest way to generate C++ code using WinLMX is to locate the XML specification file in the Windows File Explorer and drag and drop it onto an instance of WinLMX, or even a shortcut on your desktop. If you do that, WinLMX will end up looking something like:
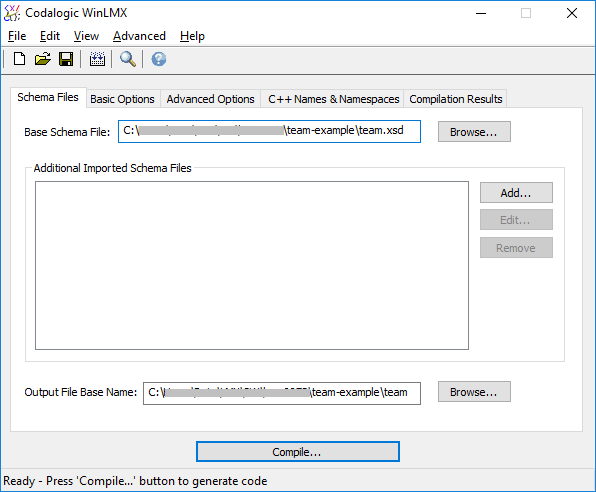
Notice that the name of the XML specification file has been put in the "Base Schema File:" text box, and the "Output File Base Name:" text box has been automatically filled in with the name of the XML specification file, minus the .xsd file extension.
LMX allows you to tailor the generated code to your preferences. For this intro, in addition to the code to read and write the XML, we want LMX to generate a file with a main() function in it with some basic test code. This can be done on WinLMX's Basic Options tab (checkbox half way down on the right-hand side):
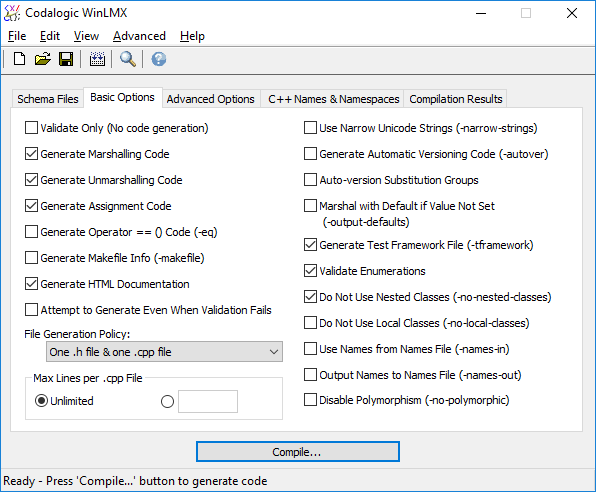
We have also selected the "Do Not Use Nested Classes" option.
LMX also allows you to store your settings in a configuration file so that you can easily re-build your project at a later time.
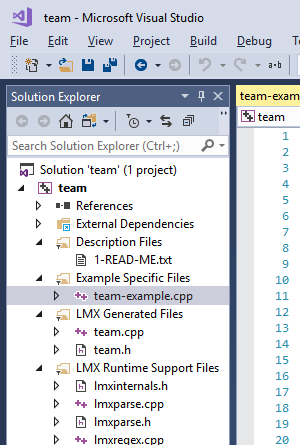
All you have to do now to generate the C++ code is press the "Compile..." button. In this case LMX will generate the following files:
- A
.h C++ header file called test.h
- A
.cpp C++ file called test.cpp
- An HTML documentation file called
test.html.
- A file called
test-main.cpp which contains the main() and test code that we wanted.
Inspecting the generated C++ code
Show Generated .h File
//
//                  W A R N I N G:  DO NOT MANUALLY MODIFY THIS FILE
//                  ------------------------------------------------
//
// This file has been automatically generated by Codalogic's LMX W3C Schema to
// C++ compiler.
//
// It should not be manually modified as this may cause the code to break, or
// operate in unexpected ways.
//
// To change the contents of this file, modify the schema, and then re-compile.

//                 Copyright (c) 2010 Codalogic Ltd.
//
// See the LMX license agreement for restrictions on the use of this file.

// THIS FILE AND THE SOFTWARE CONTAINED HEREIN IS PROVIDED "AS IS", WITHOUT
// WARRANTY OF ANY KIND.
//
// CODALOGIC LTD SHALL NOT BE LIABLE FOR ANY DAMAGES SUFFERED BY ANYONE
// OR ANYTHING DUE TO THE USE OF THIS FILE HOWEVER THEY MAY BE CAUSED.
//
// For more information on the LMX compiler, go to:
//
//     http://www.xml2cpp.com
//
// Also see:
//
//     http://www.codalogic.com
//

// Generated: Wed Nov 10 09:21:00 2010
// TargetNamepsace: http://codalogic.com/schemas/team.xsd
// Source File: team.xsd
// LMX Version: 5.4
// Compile options: -no-lic-info team.xsd team
//
//       Copyright (c) 2010 Codalogic Ltd.

#ifndef __TEAM_H__
#define __TEAM_H__

#if defined( _MSC_VER ) && _MSC_VER >= 1400
#pragma warning (push)
#pragma warning (disable:4100)  // Disable unreferenced formal parameter
#endif

#include "lmxuser.h"

// To help MS intellisense
#ifndef LMX_GDECL
#define LMX_GDECL
#endif

LMX_GDECL extern const lmx::s_ns_map ns_map_reader[];
LMX_GDECL extern const lmx::s_ns_map ns_map_writer_1[];

enum
{
    e_error = lmx::EXE_LAST_XML_EVENT,
    e_1000_ProjectTeam,
    e_1000_TeamName,
    e_1000_Member,
    e_1000_Name,
    e_1000_BrainPower,
    e_2_lang,
    e_2_space,
    e_2_base,
    e_2_id,
    e_any
};

enum elmx_enums
{
    e_e_unknown,
    e_enum_default,
    e_enum_preserve
};

#ifdef LMX_USER_VALIDATE
lmx::elmx_error user_validator_1( const lmx::tlmx_unicode_string &, const char * );
#endif // LMX_USER_VALIDATE

#ifdef LMX_USER_VALIDATE
lmx::elmx_error user_validator_2( const lmx::tlmx_uns32 &, const char * );
#endif // LMX_USER_VALIDATE

// From: team.xsd(16)
class c_TeamMember
{
private:
    // Element(s)
    lmx::ct_simple_non_pod_single< lmx::tlmx_unicode_string > m_Name;
    lmx::ct_simple_pod_single< lmx::tlmx_uns32 > m_BrainPower;

    static const lmx::s_event_map attr_event_map[];
    static const lmx::s_event_map elem_event_map[];

public:
    LMX_GDECL c_TeamMember();
    LMX_GDECL c_TeamMember( const c_TeamMember &ar_rhs );
    LMX_GDECL c_TeamMember & operator = ( const c_TeamMember &ar_rhs );
    LMX_GDECL virtual c_TeamMember * clone() const;
    LMX_GDECL void swap( c_TeamMember &ar_rhs );
    LMX_GDECL virtual ~c_TeamMember();

    // Element(s)

    //    Name --> xs:string
    LMX_GDECL const lmx::tlmx_unicode_string & get_Name() const { return m_Name.get(); }
    LMX_GDECL lmx::elmx_error set_Name( const lmx::tlmx_unicode_string & a ) { return m_Name.set( a ); }

    //    BrainPower --> xs:unsignedInt{0<=x<=4294967295}
    LMX_GDECL lmx::tlmx_uns32 get_BrainPower() const { return m_BrainPower.get(); }
    LMX_GDECL lmx::elmx_error set_BrainPower( lmx::tlmx_uns32 a );

    LMX_GDECL bool is_occurs_ok() const;

    // General marshal/unmarshal functions
    LMX_GDECL lmx::elmx_error marshal( lmx::c_xml_writer &ar_writer, const char *ap_name = "TeamMember" ) const;
    LMX_GDECL lmx::elmx_error unmarshal( lmx::c_xml_reader &ar_reader, const std::string &ar_name );
    LMX_GDECL void reset();

protected:
    LMX_GDECL void marshal_attributes( lmx::c_xml_writer & LMX_UNUSED_PARAM(ar_writer) ) const {}
    LMX_GDECL lmx::elmx_error marshal_child_elements( lmx::c_xml_writer &ar_writer ) const;
    LMX_GDECL bool unmarshal_attributes( lmx::c_xml_reader &ar_reader, lmx::elmx_error *ap_error );
    LMX_GDECL lmx::elmx_error unmarshal_attributes_check( lmx::c_xml_reader &ar_reader );
    LMX_GDECL bool unmarshal_body( lmx::c_xml_reader &ar_reader, lmx::elmx_error *ap_error );

private:
    LMX_GDECL void init();
    LMX_GDECL void release();
};

// From: team.xsd(6)
class c_ProjectTeam
{
private:
    // Element(s)
    lmx::ct_simple_non_pod_single< lmx::tlmx_unicode_string > m_TeamName;
    lmx::ct_complex_multi< c_TeamMember > m_Member;

    static const lmx::s_event_map attr_event_map[];
    static const lmx::s_event_map elem_event_map[];

public:
    LMX_GDECL c_ProjectTeam();
    LMX_GDECL c_ProjectTeam( const c_ProjectTeam &ar_rhs );
    LMX_GDECL c_ProjectTeam & operator = ( const c_ProjectTeam &ar_rhs );
    LMX_GDECL virtual c_ProjectTeam * clone() const;
    LMX_GDECL void swap( c_ProjectTeam &ar_rhs );
    LMX_GDECL c_ProjectTeam( lmx::c_xml_reader & ar_reader, lmx::elmx_error *ap_error );
    // Convenience constructors
    LMX_GDECL c_ProjectTeam( const char ac_file_name[], lmx::elmx_error *ap_error );
    #if LMX_WANT_WIDE_FILE_NAMES == 1
        LMX_GDECL c_ProjectTeam( const wchar_t ac_file_name[], lmx::elmx_error *ap_error );
    #endif
    LMX_GDECL c_ProjectTeam( const char *ap_memory, size_t a_memory_size, lmx::elmx_error *ap_error );
    LMX_GDECL c_ProjectTeam( const std::string &ar_string, lmx::elmx_error *ap_error );
    LMX_GDECL c_ProjectTeam( const lmx::c_any_info &ar_any_info, lmx::elmx_error *ap_error );
    LMX_GDECL virtual ~c_ProjectTeam();

    // Element(s)

    //    TeamName --> xs:string
    LMX_GDECL const lmx::tlmx_unicode_string & get_TeamName() const { return m_TeamName.get(); }
    LMX_GDECL lmx::elmx_error set_TeamName( const lmx::tlmx_unicode_string & a ) { return m_TeamName.set( a ); }

    //    Member --> TeamMember[0..*]
    LMX_GDECL const c_TeamMember & get_Member( size_t a_index ) const { return m_Member.get( a_index ); } // For read access
    LMX_GDECL lmx::elmx_error append_Member() { return append_Member( new c_TeamMember ); }                    // For write access
    LMX_GDECL lmx::elmx_error append_Member( c_TeamMember *a_p ) // For write access
    {
        std::auto_ptr< c_TeamMember > lap_p( a_p );
        m_Member.append( lap_p );
        return lmx::ELMX_OK;
    }
    LMX_GDECL c_TeamMember & back_Member() { return m_Member.back(); }                       // For write access
    LMX_GDECL lmx::elmx_error insert_Member( size_t a_index ) { return insert_Member( a_index, new c_TeamMember ); }    // For write access
    LMX_GDECL lmx::elmx_error insert_Member( size_t a_index, c_TeamMember * a_p ) // For write access
    {
        std::auto_ptr< c_TeamMember > lap_p( a_p );
        m_Member.insert( a_index, lap_p );
        return lmx::ELMX_OK;
    }
    LMX_GDECL c_TeamMember & get_Member( size_t a_index ) { return m_Member.get( a_index ); }        // For read/write access
    LMX_GDECL void delete_Member( size_t a_index )
    {
        lmx_assert( a_index < m_Member.size() );
        m_Member.erase( a_index );
    }
    LMX_GDECL void clear_Member() { m_Member.clear(); }
    LMX_GDECL c_TeamMember & assign_Member( size_t a_index, const c_TeamMember & a ) { return get_Member( a_index ) = a; } // Deep Copy
    LMX_GDECL size_t size_Member() const { return m_Member.size(); }

    LMX_GDECL bool is_occurs_ok() const
    {
        if( ! m_TeamName.is_occurs_ok( true )  )
            return false;
        return true;
    }

    LMX_GDECL static const lmx::s_ns_map *ns_map() { return ns_map_reader; }
    // Convenience marshal/unmarshal functions
    LMX_GDECL lmx::elmx_error marshal( const char ac_file_name[] ) const;
    #if defined( _MSC_VER ) && _MSC_VER >= 1400
        LMX_GDECL lmx::elmx_error marshal( const wchar_t ac_file_name[] ) const;
    #endif
    LMX_GDECL lmx::elmx_error marshal( std::string *ap_string ) const;
    LMX_GDECL lmx::elmx_error marshal( std::ostream &ar_sos ) const;
    LMX_GDECL lmx::elmx_error unmarshal( const char ac_file_name[] );
    #if LMX_WANT_WIDE_FILE_NAMES == 1
        LMX_GDECL lmx::elmx_error unmarshal( const wchar_t ac_file_name[] );
    #endif
    LMX_GDECL lmx::elmx_error unmarshal( const char *ap_memory, size_t a_memory_size );
    LMX_GDECL lmx::elmx_error unmarshal( const std::string &ar_string )
    {
        return unmarshal( ar_string.data(), ar_string.size() );
    }
    LMX_GDECL lmx::elmx_error unmarshal( const lmx::c_any_info &ar_any_info );

    // General marshal/unmarshal functions
    LMX_GDECL lmx::elmx_error marshal( lmx::c_xml_writer &ar_writer, const char *ap_name = "ProjectTeam" ) const;
    LMX_GDECL lmx::elmx_error unmarshal( lmx::c_xml_reader &ar_reader );
    LMX_GDECL lmx::elmx_error unmarshal( lmx::c_xml_reader &ar_reader, const std::string &ar_name );
    LMX_GDECL void reset();

protected:
    LMX_GDECL void marshal_attributes( lmx::c_xml_writer & LMX_UNUSED_PARAM(ar_writer) ) const {}
    LMX_GDECL lmx::elmx_error marshal_child_elements( lmx::c_xml_writer &ar_writer ) const;
    LMX_GDECL bool unmarshal_attributes( lmx::c_xml_reader &ar_reader, lmx::elmx_error *ap_error );
    LMX_GDECL lmx::elmx_error unmarshal_attributes_check( lmx::c_xml_reader &ar_reader );
    LMX_GDECL bool unmarshal_body( lmx::c_xml_reader &ar_reader, lmx::elmx_error *ap_error );

private:
    LMX_GDECL void init();
    LMX_GDECL void release();
};

#if defined( _MSC_VER ) && _MSC_VER >= 1400
#pragma warning (pop)  // Restore disabled warnings
#endif


#endif      // End of include guard
Hide Generated .h File
Show Generated .cpp File
//
//                  W A R N I N G:  DO NOT MANUALLY MODIFY THIS FILE
//                  ------------------------------------------------
//
// This file has been automatically generated by Codalogic's LMX W3C Schema to
// C++ compiler.
//
// It should not be manually modified as this may cause the code to break, or
// operate in unexpected ways.
//
// To change the contents of this file, modify the schema, and then re-compile.

//                 Copyright (c) 2010 Codalogic Ltd.
//
// See the LMX license agreement for restrictions on the use of this file.

// THIS FILE AND THE SOFTWARE CONTAINED HEREIN IS PROVIDED "AS IS", WITHOUT
// WARRANTY OF ANY KIND.
//
// CODALOGIC LTD SHALL NOT BE LIABLE FOR ANY DAMAGES SUFFERED BY ANYONE
// OR ANYTHING DUE TO THE USE OF THIS FILE HOWEVER THEY MAY BE CAUSED.
//
// For more information on the LMX compiler, go to:
//
//     http://www.xml2cpp.com
//
// Also see:
//
//     http://www.codalogic.com
//

// Generated: Wed Nov 10 09:21:00 2010
// TargetNamepsace: http://codalogic.com/schemas/team.xsd
// Source File: team.xsd
// LMX Version: 5.4
// Compile options: -no-lic-info team.xsd team
//
//       Copyright (c) 2010 Codalogic Ltd.

#if defined( _MSC_VER ) && _MSC_VER > 1000
#pragma warning (disable:4786)  // Disable truncated debug info warning
#pragma warning (disable:4100)  // Disable unreferenced formal parameter
#pragma warning (disable:4702)  // Disable unreachable code
#endif

#include <algorithm>
#include <memory>
#ifndef LMX_GEN_SOURCE
#define LMX_GEN_SOURCE
#endif

#include "team.h"
#include "lmxparse.h"

#if defined( _MSC_VER ) && _MSC_VER <= 1200
using namespace lmx;
#endif

const lmx::tlmx_unicode_string limit_9_e0( lmx::inittowstring( "default" ) );
const lmx::tlmx_unicode_string limit_9_e1( lmx::inittowstring( "preserve" ) );

const lmx::s_ns_map ns_map_reader[] =
{
    { 1000, "",         "http://codalogic.com/schemas/team.xsd" },
    { 0,    LMXNULL,    LMXNULL }
};

const lmx::s_ns_map ns_map_writer_1[] =
{
    { 1000, "",         "http://codalogic.com/schemas/team.xsd" },
    { 0,    LMXNULL,    LMXNULL }
};

const lmx::s_event_map c_TeamMember::attr_event_map[] =
{
    { 0,                LMXNULL,                                0,  lmx::EXE_UNKNOWN }
};

const lmx::s_event_map c_TeamMember::elem_event_map[] =
{
    { 1000,             "Name",                                 4,  e_1000_Name },
    { 1000,             "BrainPower",                           10, e_1000_BrainPower },
    { 0,                LMXNULL,                                0,  lmx::EXE_UNKNOWN }
};

#ifdef LMX_USER_VALIDATE
lmx::elmx_error user_validator_1( const lmx::tlmx_unicode_string & ar_v, const char *ap_name )
{
    LMX_NO_WARN_UNUSED( ar_v );
    LMX_NO_WARN_UNUSED( ap_name );
    return lmx::ELMX_OK;
}
#endif // LMX_USER_VALIDATE

lmx::elmx_error lexical_validator_1( lmx::c_xml_reader & ar_reader, const std::string & ar_v )
{
    LMX_NO_WARN_UNUSED( ar_reader );
    LMX_NO_WARN_UNUSED( ar_v );
    return lmx::ELMX_OK;
}

lmx::elmx_error value_validator_1( lmx::c_xml_reader & ar_reader, const lmx::tlmx_unicode_string & ar_v )
{
    LMX_NO_WARN_UNUSED( ar_reader );
    LMX_NO_WARN_UNUSED( ar_v );
    return lmx::ELMX_OK;
}

const lmx::ct_typed_validation_spec< lmx::tlmx_unicode_string > validation_spec_1(
                lmx::EXWS_PRESERVE,     // Whitespace handling
                "",                     // Default value (if any)
                &lexical_validator_1,   // Lexical validator function
                &value_validator_1,     // Value validator function
                &lmx::v_to_o< lmx::tlmx_unicode_string >, // Lexical to object converter
                &lmx::o_to_v< lmx::tlmx_unicode_string > ); // Object to lexical converter

const lmx::c_big_int constant_1( "0" );

const lmx::c_big_int constant_2( "4294967295" );

#ifdef LMX_USER_VALIDATE
lmx::elmx_error user_validator_2( const lmx::tlmx_uns32 & ar_v, const char *ap_name )
{
    LMX_NO_WARN_UNUSED( ar_v );
    LMX_NO_WARN_UNUSED( ap_name );
    return lmx::ELMX_OK;
}
#endif // LMX_USER_VALIDATE

lmx::elmx_error lexical_validator_2( lmx::c_xml_reader & ar_reader, const std::string & ar_v )
{
    lmx::elmx_error l_error = lmx::ELMX_OK;
    if( ! lmx::is_valid_integer( ar_v ) && (l_error = ar_reader.handle_error( lmx::ELMX_VALUE_BAD_FORMAT )) != lmx::ELMX_OK )
        return l_error;
    if( ! ( ar_v >= constant_1 ) && (l_error = ar_reader.handle_error( lmx::ELMX_VALUE_EXCEEDS_MIN )) != lmx::ELMX_OK )
        return l_error;
    if( ! ( ar_v <= constant_2 ) && (l_error = ar_reader.handle_error( lmx::ELMX_VALUE_EXCEEDS_MAX )) != lmx::ELMX_OK )
        return l_error;
    return lmx::ELMX_OK;
}

lmx::elmx_error value_validator_2( lmx::c_xml_reader & ar_reader, const lmx::tlmx_uns32 & ar_v )
{
    LMX_NO_WARN_UNUSED( ar_reader );
    LMX_NO_WARN_UNUSED( ar_v );
    return lmx::ELMX_OK;
}

const lmx::ct_typed_validation_spec< lmx::tlmx_uns32 > validation_spec_2(
                lmx::EXWS_COLLAPSE,     // Whitespace handling
                "",                     // Default value (if any)
                &lexical_validator_2,   // Lexical validator function
                &value_validator_2,     // Value validator function
                &lmx::v_to_o< lmx::tlmx_uns32 >, // Lexical to object converter
                &lmx::o_to_v< lmx::tlmx_uns32 > ); // Object to lexical converter

c_TeamMember::c_TeamMember()
{
    init();
}

void c_TeamMember::init()
{
}

void c_TeamMember::reset()
{
    c_TeamMember l_temp;
    swap( l_temp );
}

c_TeamMember::~c_TeamMember()
{
}

c_TeamMember::c_TeamMember( const c_TeamMember & ar_rhs )
{
    LMX_NO_WARN_UNUSED( ar_rhs );
    init();
    m_Name = ar_rhs.m_Name;
    m_BrainPower = ar_rhs.m_BrainPower;
}

void c_TeamMember::swap( c_TeamMember & ar_rhs )
{
    m_Name.swap( ar_rhs.m_Name );
    m_BrainPower.swap( ar_rhs.m_BrainPower );
}

c_TeamMember & c_TeamMember::operator = ( const c_TeamMember & ar_rhs )
{
    c_TeamMember l_temp( ar_rhs );
    swap( l_temp );
    return *this;
}

c_TeamMember * c_TeamMember::clone() const
{
    return new c_TeamMember( *this );
}

lmx::elmx_error c_TeamMember::set_BrainPower( lmx::tlmx_uns32 a )
{
    return m_BrainPower.set( a );
}

bool c_TeamMember::is_occurs_ok() const
{
    if( ! m_Name.is_occurs_ok( true ) ||
            ! m_BrainPower.is_occurs_ok( true )  )
        return false;
    return true;
}

lmx::elmx_error c_TeamMember::marshal( lmx::c_xml_writer &ar_writer, const char *ap_name ) const
{
    lmx_assert( is_occurs_ok() );
    lmx::c_xml_writer_local l_xml_writer_local( ar_writer );
    ar_writer.start_element( ap_name );
    ar_writer.conditionally_select_ns_map( ns_map_writer_1 );
    ar_writer.conditionally_write_ns_attrs( false );
    lmx::elmx_error l_error;
    if( (l_error = marshal_child_elements( ar_writer )) != lmx::ELMX_OK )
        return l_error;
    ar_writer.end_element( ap_name );
    return lmx::ELMX_OK;
}

lmx::elmx_error c_TeamMember::marshal_child_elements( lmx::c_xml_writer &ar_writer ) const
{
    LMX_NO_WARN_UNUSED( ar_writer );
    lmx::elmx_error l_error = lmx::ELMX_OK;
    ar_writer.marshal_element( "Name", m_Name, validation_spec_1 );
    ar_writer.marshal_element( "BrainPower", m_BrainPower, validation_spec_2 );
    return l_error;
}

lmx::elmx_error c_TeamMember::unmarshal( lmx::c_xml_reader & ar_reader, const std::string &ar_name )
{
    if( &ar_reader.name != &ar_name )
        ar_reader.name = ar_name;
    lmx::elmx_error l_error;
    class c_TeamMember_unmarshal_helper : public lmx::c_unmarshal_helper
    {
    private:
        c_TeamMember *p_parent;
        lmx::c_xml_reader & r_reader;
    public:
        c_TeamMember_unmarshal_helper( c_TeamMember *ap_parent, lmx::c_xml_reader & ar_reader )
            : lmx::c_unmarshal_helper( ar_reader ), p_parent( ap_parent ), r_reader( ar_reader ) {}
        virtual bool unmarshal_attribute( lmx::elmx_error *ap_error )
                { return p_parent->unmarshal_attributes( r_reader, ap_error ); }
        virtual lmx::elmx_error unmarshal_attributes_check()
               { return p_parent->unmarshal_attributes_check( r_reader ); }
        virtual bool unmarshal_complex_body( lmx::elmx_error *ap_error )
               { return p_parent->unmarshal_body( r_reader, ap_error ); }
    };
    // If your compiler generates errors concerning access to private/protected methods not allowed,
    // compile schema using LMX's -no-local-classes flag.
    c_TeamMember_unmarshal_helper l_helper( this, ar_reader );
    l_error = l_helper.unmarshal_complex_content( __FILE__, __LINE__ );
    return l_error;
}

bool c_TeamMember::unmarshal_attributes( lmx::c_xml_reader & ar_reader, lmx::elmx_error * ap_error )
{
    LMX_NO_WARN_UNUSED( ar_reader );
    LMX_NO_WARN_UNUSED( ap_error );
    return false;
}

lmx::elmx_error c_TeamMember::unmarshal_attributes_check( lmx::c_xml_reader & ar_reader )
{
    LMX_NO_WARN_UNUSED( ar_reader );
    return lmx::ELMX_OK;
}

bool c_TeamMember::unmarshal_body( lmx::c_xml_reader &ar_reader, lmx::elmx_error *ap_error )
{
    ar_reader.tokenise( elem_event_map, lmx::EXNT_ELEM );
    if( ar_reader.get_current_event() == e_1000_Name )
    {
        ar_reader.set_code_line( __LINE__ );
        *ap_error = ar_reader.unmarshal_child_element( m_Name, validation_spec_1, &elem_event_map[0] );
        if( *ap_error != lmx::ELMX_OK )
            return false;
    }
    else if( (*ap_error = ar_reader.handle_error( lmx::ELMX_MANDATORY_ELEMENT_MISSING, __LINE__ )) != lmx::ELMX_OK )
        return false;
    if( ar_reader.get_current_event() == e_1000_BrainPower )
    {
        ar_reader.set_code_line( __LINE__ );
        *ap_error = ar_reader.unmarshal_child_element( m_BrainPower, validation_spec_2, &elem_event_map[1] );
        if( *ap_error != lmx::ELMX_OK )
            return false;
    }
    else if( (*ap_error = ar_reader.handle_error( lmx::ELMX_MANDATORY_ELEMENT_MISSING, __LINE__ )) != lmx::ELMX_OK )
        return false;
    return true;
}

const lmx::s_event_map c_ProjectTeam::attr_event_map[] =
{
    { 0,                LMXNULL,                                0,  lmx::EXE_UNKNOWN }
};

const lmx::s_event_map c_ProjectTeam::elem_event_map[] =
{
    { 1000,             "TeamName",                             8,  e_1000_TeamName },
    { 1000,             "Member",                               6,  e_1000_Member },
    { 0,                LMXNULL,                                0,  lmx::EXE_UNKNOWN }
};

c_ProjectTeam::c_ProjectTeam()
{
    init();
}

c_ProjectTeam::c_ProjectTeam( lmx::c_xml_reader & ar_reader, lmx::elmx_error *ap_error )
{
    *ap_error = lmx::ELMX_UNDEFINED_ERROR;
    init();
    *ap_error = unmarshal( ar_reader );
}

c_ProjectTeam::c_ProjectTeam( const char ac_file_name[], lmx::elmx_error *ap_error )
{
    *ap_error = lmx::ELMX_UNDEFINED_ERROR;
    init();
    *ap_error = unmarshal( ac_file_name );
}

#if LMX_WANT_WIDE_FILE_NAMES == 1
c_ProjectTeam::c_ProjectTeam( const wchar_t ac_file_name[], lmx::elmx_error *ap_error )
{
    *ap_error = lmx::ELMX_UNDEFINED_ERROR;
    init();
    *ap_error = unmarshal( ac_file_name );
}
#endif

c_ProjectTeam::c_ProjectTeam( const char *ap_memory, size_t a_memory_size, lmx::elmx_error *ap_error )
{
    *ap_error = lmx::ELMX_UNDEFINED_ERROR;
    init();
    *ap_error = unmarshal( ap_memory, a_memory_size );
}

c_ProjectTeam::c_ProjectTeam( const std::string &ar_string, lmx::elmx_error *ap_error )
{
    *ap_error = lmx::ELMX_UNDEFINED_ERROR;
    init();
    *ap_error = unmarshal( ar_string.data(), ar_string.size() );
}

c_ProjectTeam::c_ProjectTeam( const lmx::c_any_info &ar_any_info, lmx::elmx_error *ap_error )
{
    *ap_error = lmx::ELMX_UNDEFINED_ERROR;
    init();
    *ap_error = unmarshal( ar_any_info );
}

void c_ProjectTeam::init()
{
}

void c_ProjectTeam::reset()
{
    c_ProjectTeam l_temp;
    swap( l_temp );
}

c_ProjectTeam::~c_ProjectTeam()
{
}

c_ProjectTeam::c_ProjectTeam( const c_ProjectTeam & ar_rhs )
{
    LMX_NO_WARN_UNUSED( ar_rhs );
    init();
    m_TeamName = ar_rhs.m_TeamName;
    m_Member = ar_rhs.m_Member;
}

void c_ProjectTeam::swap( c_ProjectTeam & ar_rhs )
{
    m_TeamName.swap( ar_rhs.m_TeamName );
    m_Member.swap( ar_rhs.m_Member );
}

c_ProjectTeam & c_ProjectTeam::operator = ( const c_ProjectTeam & ar_rhs )
{
    c_ProjectTeam l_temp( ar_rhs );
    swap( l_temp );
    return *this;
}

c_ProjectTeam * c_ProjectTeam::clone() const
{
    return new c_ProjectTeam( *this );
}

lmx::elmx_error c_ProjectTeam::marshal( const char ac_file_name[] ) const
{
    return lmx::marshal( *this, ac_file_name );
}

#if defined( _MSC_VER ) && _MSC_VER >= 1400
lmx::elmx_error c_ProjectTeam::marshal( const wchar_t ac_file_name[] ) const
{
    return lmx::marshal( *this, ac_file_name );
}
#endif

lmx::elmx_error c_ProjectTeam::marshal( std::string *ap_string ) const
{
    return lmx::marshal( *this, ap_string );
}

lmx::elmx_error c_ProjectTeam::marshal( std::ostream &ar_sos ) const
{
    return lmx::marshal( *this, ar_sos );
}

lmx::elmx_error c_ProjectTeam::marshal( lmx::c_xml_writer &ar_writer, const char *ap_name ) const
{
    lmx_assert( is_occurs_ok() );
    lmx::c_xml_writer_local l_xml_writer_local( ar_writer );
    ar_writer.start_element( ap_name );
    ar_writer.conditionally_select_ns_map( ns_map_writer_1 );
    ar_writer.conditionally_write_ns_attrs( false );
    lmx::elmx_error l_error;
    if( (l_error = marshal_child_elements( ar_writer )) != lmx::ELMX_OK )
        return l_error;
    ar_writer.end_element( ap_name );
    return lmx::ELMX_OK;
}

lmx::elmx_error c_ProjectTeam::marshal_child_elements( lmx::c_xml_writer &ar_writer ) const
{
    LMX_NO_WARN_UNUSED( ar_writer );
    lmx::elmx_error l_error = lmx::ELMX_OK;
    ar_writer.marshal_element( "TeamName", m_TeamName, validation_spec_1 );
    {
    for( size_t i=0; i<m_Member.size(); ++i )
    {
        if( (l_error = m_Member.get( i ).marshal( ar_writer, "Member" )) != lmx::ELMX_OK )
            return l_error;
    }
    }
    return l_error;
}

lmx::elmx_error c_ProjectTeam::unmarshal( const char ac_file_name[] )
{
    return lmx::unmarshal( this, ac_file_name );
}

#if LMX_WANT_WIDE_FILE_NAMES == 1
lmx::elmx_error c_ProjectTeam::unmarshal( const wchar_t ac_file_name[] )
{
    return lmx::unmarshal( this, ac_file_name );
}
#endif

lmx::elmx_error c_ProjectTeam::unmarshal( const char *ap_memory, size_t a_memory_size )
{
    return lmx::unmarshal( this, ap_memory, a_memory_size );
}

lmx::elmx_error c_ProjectTeam::unmarshal( const lmx::c_any_info &ar_any_info )
{
    return lmx::unmarshal( this, ar_any_info );
}

lmx::elmx_error c_ProjectTeam::unmarshal( lmx::c_xml_reader & ar_reader )
{
    ar_reader.set_code_file( __FILE__ );
    ar_reader.set_ns_map( ns_map_reader );
    lmx::elmx_error l_error = lmx::ELMX_OK;
    lmx::c_xml_reader_local l_reader_local( &ar_reader );
    ar_reader.get_element_event( &l_error );
    if( l_error != lmx::ELMX_OK && (l_error = ar_reader.handle_error( l_error, __LINE__ )) != lmx::ELMX_OK )
        return l_error;
    if( (ar_reader.get_element_ns_id() != 1000 || ar_reader.get_local_name() != "ProjectTeam") && (l_error = ar_reader.handle_error( lmx::ELMX_ELEMENT_NOT_FOUND, __LINE__ )) != lmx::ELMX_OK )
        return l_error;
    return unmarshal( ar_reader, ar_reader.name );
}

lmx::elmx_error c_ProjectTeam::unmarshal( lmx::c_xml_reader & ar_reader, const std::string &ar_name )
{
    if( &ar_reader.name != &ar_name )
        ar_reader.name = ar_name;
    lmx::elmx_error l_error;
    class c_ProjectTeam_unmarshal_helper : public lmx::c_unmarshal_helper
    {
    private:
        c_ProjectTeam *p_parent;
        lmx::c_xml_reader & r_reader;
    public:
        c_ProjectTeam_unmarshal_helper( c_ProjectTeam *ap_parent, lmx::c_xml_reader & ar_reader )
            : lmx::c_unmarshal_helper( ar_reader ), p_parent( ap_parent ), r_reader( ar_reader ) {}
        virtual bool unmarshal_attribute( lmx::elmx_error *ap_error )
                { return p_parent->unmarshal_attributes( r_reader, ap_error ); }
        virtual lmx::elmx_error unmarshal_attributes_check()
               { return p_parent->unmarshal_attributes_check( r_reader ); }
        virtual bool unmarshal_complex_body( lmx::elmx_error *ap_error )
               { return p_parent->unmarshal_body( r_reader, ap_error ); }
    };
    // If your compiler generates errors concerning access to private/protected methods not allowed,
    // compile schema using LMX's -no-local-classes flag.
    c_ProjectTeam_unmarshal_helper l_helper( this, ar_reader );
    l_error = l_helper.unmarshal_complex_content( __FILE__, __LINE__ );
    return l_error;
}

bool c_ProjectTeam::unmarshal_attributes( lmx::c_xml_reader & ar_reader, lmx::elmx_error * ap_error )
{
    LMX_NO_WARN_UNUSED( ar_reader );
    LMX_NO_WARN_UNUSED( ap_error );
    return false;
}

lmx::elmx_error c_ProjectTeam::unmarshal_attributes_check( lmx::c_xml_reader & ar_reader )
{
    LMX_NO_WARN_UNUSED( ar_reader );
    return lmx::ELMX_OK;
}

bool c_ProjectTeam::unmarshal_body( lmx::c_xml_reader &ar_reader, lmx::elmx_error *ap_error )
{
    ar_reader.tokenise( elem_event_map, lmx::EXNT_ELEM );
    if( ar_reader.get_current_event() == e_1000_TeamName )
    {
        ar_reader.set_code_line( __LINE__ );
        *ap_error = ar_reader.unmarshal_child_element( m_TeamName, validation_spec_1, &elem_event_map[0] );
        if( *ap_error != lmx::ELMX_OK )
            return false;
    }
    else if( (*ap_error = ar_reader.handle_error( lmx::ELMX_MANDATORY_ELEMENT_MISSING, __LINE__ )) != lmx::ELMX_OK )
        return false;
    while( ar_reader.get_current_event() == e_1000_Member )
    {
        ar_reader.set_code_line( __LINE__ );
        m_Member.append();
        if( (*ap_error = m_Member.back().unmarshal( ar_reader, ar_reader.name ) ) != lmx::ELMX_OK )
            return false;
        ar_reader.get_element_event( &elem_event_map[1], ap_error );
        if( *ap_error != lmx::ELMX_OK && (*ap_error = ar_reader.handle_error( *ap_error, __LINE__ )) != lmx::ELMX_OK )
            return false;
    }
    return true;
}
Hide Generated .cpp File
Show Generated .html File
Schema http://codalogic.com/schemas/team.xsd
Generated by LMX (v5.4) on: Wed Nov 21 15:21:00 2010
TargetNamepsace: http://codalogic.com/schemas/team.xsd
Source File: team.xsd
[Top] [Contents] [Back]
Contents
Global Elements
File: team.xsd
ProjectTeam (c_ProjectTeam)
Global Types
File: team.xsd
TeamMember (c_TeamMember)
Global Groups
None
[Top] [Contents] [Back]
TeamMember
| Class name: | c_TeamMember |
| Kind: | Type |
| Model: | Sequence Complex Content |
|
Name --> xs:string
| const lmx::tlmx_unicode_string & | get_Name | () const; |
| lmx::elmx_error | set_Name | ( const lmx::tlmx_unicode_string & a ); |
BrainPower --> xs:unsignedInt{0<=x<=4294967295}
| lmx::tlmx_uns32 | get_BrainPower | () const; |
| lmx::elmx_error | set_BrainPower | ( lmx::tlmx_uns32 a ); |
Common Functions
| | c_TeamMember | (); |
| | c_TeamMember | ( const c_TeamMember & ar_rhs ); |
| c_TeamMember & | operator = | ( const c_TeamMember & ar_rhs ); |
| virtual c_TeamMember * | clone | () const; |
| void | swap | ( c_TeamMember & ar_rhs ); |
| virtual | ~c_TeamMember | (); |
|
| lmx::elmx_error | marshal | ( lmx::c_xml_writer &ar_writer, const char *ap_name = "TeamMember" ) const; |
| lmx::elmx_error | unmarshal | ( lmx::c_xml_reader &ar_reader, const std::string &ar_name ); |
| void | reset | (); |
| bool | is_occurs_ok | () const; |
|
[Top] [Contents] [Back]
ProjectTeam
| Class name: | c_ProjectTeam |
| Kind: | Element |
| Model: | Sequence Complex Content |
|
TeamName --> xs:string
| const lmx::tlmx_unicode_string & | get_TeamName | () const; |
| lmx::elmx_error | set_TeamName | ( const lmx::tlmx_unicode_string & a ); |
Member --> TeamMember[0..*]
| const c_TeamMember & | get_Member | ( size_t a_index ) const; |
| lmx::elmx_error | append_Member | (); |
| lmx::elmx_error | append_Member | ( c_TeamMember * a_p ); |
| c_TeamMember & | back_Member | (); |
| lmx::elmx_error | insert_Member | ( size_t a_index ); |
| lmx::elmx_error | insert_Member | ( size_t a_index, c_TeamMember * a_p ); |
| c_TeamMember & | get_Member | ( size_t a_index ); |
| void | delete_Member | ( size_t a_index ); |
| void | clear_Member | (); |
| c_TeamMember & | assign_Member | ( size_t a_index, const c_TeamMember & a ); |
| size_t | size_Member | () const; |
Common Functions
| | c_ProjectTeam | (); |
| | c_ProjectTeam | ( const c_ProjectTeam & ar_rhs ); |
| c_ProjectTeam & | operator = | ( const c_ProjectTeam & ar_rhs ); |
| virtual c_ProjectTeam * | clone | () const; |
| void | swap | ( c_ProjectTeam & ar_rhs ); |
| | c_ProjectTeam | ( lmx::c_xml_reader & ar_reader, lmx::elmx_error *ap_error ); |
|
| | c_ProjectTeam | ( const char ac_file_name[], lmx::elmx_error *ap_error ); |
| | c_ProjectTeam | ( const wchar_t ac_file_name[], lmx::elmx_error *ap_error ); |
| | c_ProjectTeam | ( const char *ap_memory, size_t a_memory_size, lmx::elmx_error *ap_error ); |
| | c_ProjectTeam | ( const std::string &ar_string, lmx::elmx_error *ap_error ); |
| | c_ProjectTeam | ( const lmx::c_any_info &ar_any_info, lmx::elmx_error *ap_error ); |
| virtual | ~c_ProjectTeam | (); |
|
| lmx::elmx_error | marshal | ( const char ac_file_name[] ) const; |
| lmx::elmx_error | marshal | ( const wchar_t ac_file_name[] ) const; |
| lmx::elmx_error | marshal | ( std::string *ap_string ) const; |
| lmx::elmx_error | marshal | ( std::ostream &ar_sos ) const; |
| lmx::elmx_error | unmarshal | ( const char ac_file_name[] ); |
| lmx::elmx_error | unmarshal | ( const wchar_t ac_file_name[] ); |
| lmx::elmx_error | unmarshal | ( const char *ap_memory, size_t a_memory_size ); |
| lmx::elmx_error | unmarshal | ( const std::string &ar_string ); |
| lmx::elmx_error | unmarshal | ( const lmx::c_any_info &ar_any_info ); |
|
| lmx::elmx_error | marshal | ( lmx::c_xml_writer &ar_writer, const char *ap_name = "ProjectTeam" ) const; |
| lmx::elmx_error | unmarshal | ( lmx::c_xml_reader &ar_reader ); |
| lmx::elmx_error | unmarshal | ( lmx::c_xml_reader &ar_reader, const std::string &ar_name ); |
| void | reset | (); |
| bool | is_occurs_ok | () const; |
|
[Top] [Contents] [Back]
Hide Generated .html File
If you look at the generated .h you will notice that there are two classes defined - c_ProjectTeam and c_TeamMember - that correspond to the complex types defined in the XML Schema:
class c_ProjectTeam
{
private:
    // Element(s)
    lmx::ct_simple_non_pod_single< lmx::tlmx_unicode_string > m_TeamName;
    lmx::ct_complex_multi< c_TeamMember > m_Member;
...
and:
class c_TeamMember
{
private:
    // Element(s)
    lmx::ct_simple_non_pod_single< lmx::tlmx_unicode_string > m_Name;
    lmx::ct_simple_pod_single< lmx::tlmx_uns32 > m_BrainPower;
...
As you can see, they have data members corresponding to the element declarations in the XML Schema.
Moving down the c_ProjectTeam class, you will see a number of contructors and a destructor, for example:
    LMX_GDECL c_ProjectTeam();
    LMX_GDECL c_ProjectTeam( const c_ProjectTeam &ar_rhs );
    LMX_GDECL c_ProjectTeam & operator =( const c_ProjectTeam &ar_rhs );
    LMX_GDECL void swap( c_ProjectTeam &ar_rhs );
    // Convenience constructors
    LMX_GDECL c_ProjectTeam( const char ac_file_name[], lmx::elmx_error *ap_error );
    #ifdef _MSC_VER
        LMX_GDECL c_ProjectTeam( const wchar_t ac_file_name[], lmx::elmx_error *ap_error );
    #endif
    LMX_GDECL c_ProjectTeam( const char *ap_memory, size_t a_memory_size, lmx::elmx_error *ap_error );
    LMX_GDECL c_ProjectTeam( const std::string &ar_string, lmx::elmx_error *ap_error );
    LMX_GDECL virtual ~c_ProjectTeam();
These allow you to construct instances of the object from various sources of XML, such as a file or memory.
For example, you could use these constructors to create an object from the XML contained in the file my_file.xml using the code:
    lmx::elmx_error error;
    const c_ProjectTeam my_object( "my_file.xml", &error );
Further down the C++ class you will see the accessor methods, for example:
    // Element(s)
    //    TeamName --> xs:string
    LMX_GDECL const lmx::tlmx_unicode_string & get_TeamName() const;
    LMX_GDECL lmx::elmx_error set_TeamName( const lmx::tlmx_unicode_string & a );

    //    Member --> TeamMember[0..*]
    LMX_GDECL const c_TeamMember & get_Member( size_t a_index ) const; // For read access
    LMX_GDECL lmx::elmx_error append_Member();               // For write access
    LMX_GDECL c_TeamMember & back_Member();                  // For write access
    LMX_GDECL lmx::elmx_error insert_Member( size_t a_index ); // For write access
    LMX_GDECL c_TeamMember & get_Member( size_t a_index );   // For read/write access
    LMX_GDECL void  delete_Member( size_t a_index );
    LMX_GDECL void  clear_Member();
    LMX_GDECL c_TeamMember & assign_Member( size_t a_index, const c_TeamMember & a ); // Deep copy
    LMX_GDECL size_t size_Member() const;
Once again, the accessor method names correspond to the elements declared in the XML specification.
The methods for setting and getting the TeamName are quite straight forward. You will notice that the type used by these methods is lmx::tlmx_unicode_string. This can be typedefed to std::wstring, std::string, or, with possibly a little more work, to any other string type you prefer to use. Swapping between using std::string and std::wstring is particularly easy, and can be done by setting a #define in your project setup.
The accessor methods for Member are a bit more involved. This is because there can be more than one instance of Member and so there are methods to insert and extract instances of Member. If not all of these operations are required, the LMX code generator supports a flag that causes only a minimal set of methods to be generated (although often an optimizing compiler will not generate code for methods that are not used).
LMX also generates methods to read in XML, via unmarshal() methods and write out XML, via marshal() methods:
    // Convenience marshal/unmarshal functions
    LMX_GDECL lmx::elmx_error marshal( const char ac_file_name[] ) const;
    #if defined( _MSC_VER ) && _MSC_VER >= 1400
        LMX_GDECL lmx::elmx_error marshal( const wchar_t ac_file_name[] ) const;
    #endif
    LMX_GDECL lmx::elmx_error marshal( std::string *ap_string ) const;
    LMX_GDECL lmx::elmx_error marshal( std::ostream &ar_sos ) const;
    LMX_GDECL lmx::elmx_error unmarshal( const char ac_file_name[] );
    #ifdef _MSC_VER
        LMX_GDECL lmx::elmx_error unmarshal( const wchar_t ac_file_name[] );
    #endif
    LMX_GDECL lmx::elmx_error unmarshal( const char *ap_memory, size_t a_memory_size );
    LMX_GDECL lmx::elmx_error unmarshal( const std::string &ar_string )
    {
        return unmarshal( ar_string.data(), ar_string.size() );
    }
For example, to marshal an object to XML simply by doing:
my_object.marshal( "my_file.xml" );
Looking at the .cpp, you will see code such as:
if( ar_reader.get_current_event() == e_1000_BrainPower )
{
    bool l_is_empty_element;
    if( ar_reader.get_simple_type_value( *ap_name, lmx::EXWS_COLLAPSE,
            &ar_reader.value, ap_error, &l_is_empty_element ) )
    {
        ar_reader.set_code_line( __LINE__ );
        *ap_error = ar_reader.unmarshal_child_element( m_BrainPower, validation_spec_2, &elem_event_map[1] );
        if( *ap_error != lmx::ELMX_OK )
            return false;
    }
Note that in addition to reading in the actual values, the generated code also tests that the read values are of a suitable type and within the bounds specified by the schema.
Using the generated C++ code
We mentioned that LMX could be instructed to generate a file with a
main() that contains test code. This is a good way to start exploring the generated code.
For this intro we'll look at a simple example:
#include <iostream>

#include "team.h"

int main( int argc, char *argv[] )
{
    const char *xml_file = "team.xml";

    if( argc >= 2 )
        xml_file = argv[1];

    lmx::elmx_error error;
    c_ProjectTeam project_team( xml_file, &error );

    if( error != lmx::ELMX_OK )
    {
        std::cout << "Unable to unmarshal\n";
        LMX_OUTPUT_DEBUG_ERROR( std::cout );    // Will only output debug info in debug mode
        return 1;
    }

    unsigned int total_brain_power = 0;
    for( size_t i=0; i < project_team.size_Member(); ++i )
        total_brain_power += project_team.get_Member( i ).get_BrainPower();

    std::cout <<
            "The total brain power for project team " <<
            lmx::convert_to_narrow( project_team.get_TeamName() ) <<
            " is " << total_brain_power << "\n";

    #ifdef _MSC_VER     // Allow for operation inside IDE
    std::cout << "----Press <Return> to continue----\n";
    std::cin.get();
    #endif

    return 0;
}
This code opens an XML files specified on the command line, sums the brain power of all the team members and prints the result to std::cout.
Looking at the code in more detail, after including iostream to enable console I/O, we have:
#include "team.h"
This is the generated C++ header file. When used in the basic form this is the only C++ XML data binding related header file that needs to be included in the code, which makes code easy to setup.
After performing some checking whether the command-line includes a file name argument, an XML instance is read in from the selected file name:
    lmx::elmx_error error;
    c_ProjectTeam project_team( xml_file, &error );
As you can see, this is a very simple operation, at the end of which the
project_team C++ object will be populated with the data from the XML instance.
If, after unmarshalling the XML instance, you didn't want to change the contents of project_team you could unmarshal to a const instance of project_team, for example, by changing the second line to:
const c_ProjectTeam project_team( xml_file, &error );
The error variable retrieves any error code if there are problems with the unmarshalling operation. The next section of code shows an example of how that error code can be used:
    if( error != lmx::ELMX_OK )
    {
        std::cout << "Unable to unmarshal\n";
        LMX_OUTPUT_DEBUG_ERROR( std::cout );    // Will only output debug info in debug mode
        return 1;
    }
Note that if you prefer, you can configure LMX to throw a C++ exception if an error occurs, rather than returning an error code.
The next task is to sum the brain power for the entire team. This is done using the following code:
    unsigned int total_brain_power = 0;
    for( size_t i=0; i < project_team.size_Member(); ++i )
        total_brain_power += project_team.get_Member( i ).get_BrainPower();
As there are multiple instances of
Member within
project_team,
project_team.size_Member() is used to return how many instances there are, and
project_team.get_Member( i ) returns a C++ reference to the zero based i-th instance. The
get_BrainPower() method can then be called on this reference, and the brain power value is returned. Note that
get_BrainPower() returns an actual C++ integer value and not a string containing the text version of an integer. Hence you do not to do a manual conversion from text to integer in your code.
You can see here that we are using application-specific named methods to access the data we want. The advantage of this is that if you type the wrong name into the code, a compile-time error will occur and you can fix it quickly. This is highly favorable to using generic methods that take the name of the desired elements and attributes as string parameters. If such string parameters are typed wrong, the error is only detected at run-time, which, with code that has a number of execution paths may only be detected a long time after the code is initially entered. The LMX C++ XML data binding approach therefore significantly reduces the potential for introducing such accidental bugs.
And, depending on the IDE you are using, another benefit is that IDE features such as intelliSense and automatic code completion can be used, making it not only easier to find out what child element and attribute methods are accessible for your current complex type, but also speeding up code entry.
When the total team brain power is calculated, it is printed to the screen. This is done using the following lines:
    std::cout <<
            "The total brain power for project team " <<
            lmx::convert_to_narrow( project_team.get_TeamName() ) <<
            " is " << total_brain_power << "\n";
Note the
lmx::convert_to_narrow(). LMX is fully Unicode compliant, and out-of-the-box string values are returned as instances of std::wstring. However, LMX can be easily configured to return strings as instances of std::string. This can be done by setting an appropriate C++
#define in your project. We've chosen not to do this in this example because we wanted to keep the configuration side as transparent as possible for you. There are however, many such things that can be configured in LMX.
That's really it for this C++ XML data binding example. The lines that follow just give you an opportunity to see the output generated by the program when running inside an IDE.
If you want to experiment further, you can add the following lines after the result of the brain power calculation is output to std::cout.
    project_team.append_Member();
    project_team.back_Member().set_Name( L"Obi Wan" );
    project_team.back_Member().set_BrainPower( 200 );

    std::cout << "Revised XML:\n";
    if( project_team.marshal( std::cout ) != lmx::ELMX_OK )
    {
        std::cout << "Unable to marshal revised XML\n";
        LMX_OUTPUT_DEBUG_ERROR( std::cout );    // Will only output debug info in debug mode
        return 2;
    }
The first three lines add a new member to the project_team. The first of these actually adds a new c_TeamMember instance to the project_team collection. The following two set the name and brain power of the member using the project_team's
back_Member() method which returns a reference to the last member in the collection in much the same way that C++ STL containers
back() methods do.
The project_team.marshal( std::cout ) line marshals the project team object to std::cout. The lines that follow check that the operation was successful.
Building the generated code
In addition to the generated code and your project code, to build an executable you will also need what we call the LMX "Supporting Software". This includes the LMX XML parser and the code for XML Schema types such as dateTime and so on. This is available in binary form for various compilers, such as
lmx-MTd-vc9.lib which is the non-DLL multi-threaded debug version for Visual Studio 2008 (
See documentation for more details). The code is also available in source code form allowing the generated code to be cross-platform.
You will also need to provide your compiler with access to the LMX "Supporting Software" header files.
Concluding the LMX Quick Intro
That just about concludes our quick intro. We hope that you can see that LMX C++ XML data binding is very simple to use. C++ code generation can be as simple as dragging a file over the LMX application and pressing a 'Complile' button, marshalling and unmarshalling XML instances can be as simple as one line of code, and getting and setting data is very simple and intuitive. This all makes using LMX quick and easy to use.
The approach of using application-specific named methods also dramatically reduces the potential for introducing accidental coding bugs by allowing the C++ compiler to do more checking at compile-time, rather than (hopefully) detecting such errors at run-time.
Exploring Codalogic LMX further
Codalogic LMX XML C++ Databinder has many features, such a the ability to augment the generated classes with your own code, the ability to customize the names of methods, the ability to set and manage C++ and XML namespaces, the ability to customize string handling plus other aspects of XML to C++ type mapping, and much more. You can find more about the benefits of using LMX on the
LMX Benefits Page.
To further explore Codalogic LMX we suggest downloading the evaluation version of LMX. If you enter your e-mail address on the download page we can send you a 15-day evaluation license that enables full functionality.

Or you could obtain a free Express Edition license. You can obtain one of these from the LMX purchase page.
You can also download our basic C++ XML binding example, or our XML C++ SOAP data binding example.
Another option, if you have a small XML specification to experiment with, is to try Codalogic LMX XML C++ code generation on-line.
Lastly, if you have any questions about Codalogic LMX XML C++ Data binding, we are here to help. Just send us an e-amil at: